As anyone who's been bitten by the DIY bug can tell you, home improvement often happens in stages. There are times when we feel ready to tear out tiles and repaint entire rooms and other days when we simply can't imagine setting everything else aside and focusing on a project. It's a process of budgeting not only monetary resources but time, energy and even inspiration. Hanging blinds falls on the lower end of the DIY effort spectrum, but they still have the potential to really update the look and feel of a space. Learn how to install them yourself in one weekend to have a big impact on any room you put them in.
Why install new blinds?
It's important to consider what you plan to use your blinds for, and how important they are to what you're trying to accomplish in the room. Blinds and window coverings in general are used to control how much light is let into each room, the level of privacy we enjoy and the temperature of the space. They also add colour and design appeal. It's a good idea to consider adding blinds to a room if:
- You have drafty windows that are raising your energy costs
- You get a lot of sun in this room, causing a greenhouse effect and potentially fading your furnishings
- You have a room that overlooks a busy area, like a street or a neighbour's yard, and you need some privacy
- The room has an "unfinished" look to it, and the blinds would help give it a finishing touch
Purchasing the blinds
To make the process as easy as possible, consider ordering your blinds online. When you find something you like, they let you request a sample of the materials to see in your home.
Once you have samples, place them in your window and observe them at different times of day. This will let you see how light affects them, and lets you ensure you'll still like them in the evening with artificial light, as well as first thing in the morning. A swatch of block-out fabric, for example, may look much different in cool morning light than it will in the bright midday sun. You'll also want to choose a colour that you actually like; one that you can easily 'live with' and that will add to the room's decor.
If you are not planning on going with a basic white or other neutral, make the colour selection process easier for yourself by taking a look at the rest of the room's décor, and pulling a colour that's already in the room. For example, take a look at your throw pillows, rugs, and wall art and find a secondary colour to repeat. This will ensure your blinds blend in well with the rest of the room.
Choosing the blinds for a room
As you research the different types of blinds available you'll probably notice that some styles of blinds are better for rooms like kitchens and bathrooms. Steam, heat and splashes of water, soap or even food can quickly warp real wooden blinds, so it's best to stick to faux wood or synthetic options for these spaces.
Wooden blinds are perfect for use in bedrooms, living areas or dens to add a warm, organic feel to the space. Roman blinds are great for covering the entire window to retain heat and enjoying the curtain-like appeal of draped fabric, while roller blinds are a chic, smart solution for use in almost any area. Most blinds can also be used in conjunction with a curtain to help maximize their energy savings and appearance.
Measuring for the Blinds
Make sure that before you order you take careful measurements of your window casing, and determine whether the blinds will be installed on the inside of the window frame, or outside it on the wall. Not every type of blind installs the same way, and windows and blinds both come in a variety of different sizes. If you're installing the blinds on the outside of the window, it's OK to go a little bigger than the actual size of the window; blinds installed inside the frame need to be precise in order to fit properly. Keep in mind that blinds installed outside of the window frame tend to make it look larger, and block more light than blinds installed inside the frame. However in situations where many windows are installed close together, putting the blinds inside each frame gives a cleaner look.
The Project
From start to finish, you should be able to install your blinds in about an hour. Most blinds can be installed by one person, although a helper sometimes comes in handy, particularly if you are installing wide blinds, as the helper can keep assist you in keeping the ends balanced.
Materials and Tools
- Measuring tape
- Pencil
- Drill
- Screwdriver
- Screws
- Blinds and accompanying brackets
Instructions
You will have determined whether your blinds will be mounted inside the window frame or on the window frame or wall and measured the frame beforehand. If not, take the time to determine where the blinds will be installed, and measure the area before ordering the blinds. Measure one more time after you have the blinds and before you begin to ensure there is no error before you start drilling.
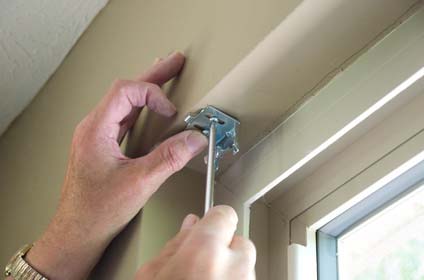
- Place the control bracket on the frame or wall where you want the blinds to extend to. This bracket will hold the side of the blind with the control features. Mark its position with a pencil and set it aside.
- Pre-drill the holes necessary to hold the bracket in place.
- Set the bracket back on its mark and screw it securely into place. Keep in mind that although wood screws have probably been provided, you may need special screws for installation in gyprock or brick walls.
- Repeat the process to install the idle bracket (for the control-free side of the blind).
- Place the header into the brackets and gently pull down to click into place.
- Attach the valance if your blinds have one by lining it up with the header and snapping it into place.
- Finish by installing the child safety device (also known as the chain tension device) to the wall beside the blind. Place the device at the desired height on the wall and mark its position with the pencil. Pre-drill your holes, set the device back into place and screw it in securely. The device lets you wrap the chain or cord to keep it well out of reach, and prevent it from forming the long hanging loop that can be dangerous for children.
*Roller, Venetian and Roman blinds may have slightly different installation procedures but each set of blinds will come with manufacturer's instructions to help you make sense of the process.
Checklist
The checklist for a week-end blinds project is quite simple, especially if you shop online:
- Determine your goals for your blinds- how much light you'd like to filter in, how much privacy you need and whether they'll be used to help regulate your temperature.
- Measure your windows.
- Log on and start shopping! Request samples as necessary.
- Make your purchase and wait for your blinds to arrive in the post.
- Gather your screwdriver, drill, extra screws and a step ladder if necessary.
- Install and enjoy!