
There are many different factors to consider when it comes to choosing, making and installing curtains. From the style of curtain to the type of track to use, it is important to evaluate all the options in order to make the best decision for your space. To start, let's take a look at the basic component of curtains and hanging systems.
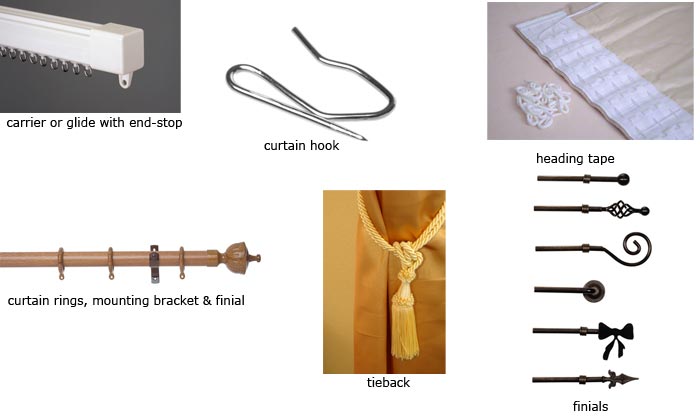
Curtain hardware & hanging system accessories
Carrier or glide is a piece of sliding plastic in a rod with a hole where the curtain hook is inserted.
Curtain rings can be attached to a curtain to aid with sliding the curtain along the curtain rod. Similar to finials, they come in a range of styles to suit the decor of the space.
Curtain heading is the top part of the curtain where the heading tape is sewn onto.
Drops and connectors are used to lower curtains.
End stops slide into the end of the track in order to prevent the curtain from sliding off the rod or track.
Finials are the ends of the curtain rods. Finials are a visible part of the curtain rod so they are often used as decorative pieces and come in a wide range of designs, shapes and finishes.
Heading tape is the fabric that is sewn into pleats, and it provides an opportunity to incorporate various designs, depending on the type of curtains.
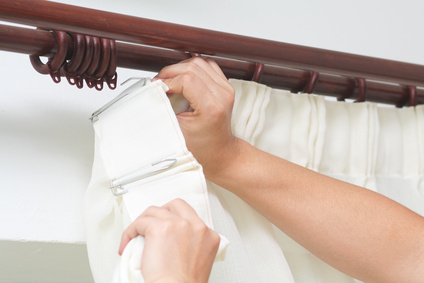
Hooks are the hardware that connects the curtain to the rod or the track.
Mounting brackets are used to help mount a curtain track to the wall or ceiling. Mounting brackets come in all C-shapes and sizes.
Snap tape is typically sewn onto the top of the curtain and is attached to a horizontal curtain track with a snap button.
Tiebacks are the piece of material that holds the curtain back. The material can vary from a chain to a cord, or simply a piece of fabric that loops around the curtain to keep them open.
Wands and batons are used to open and close curtains
Valances & pelmets
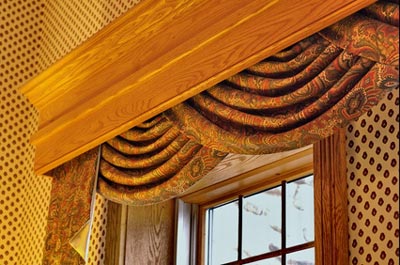
Valance & pelmet
A valance or pelmet (also called a cornice or cornice board) is used at the top of the curtain. It spans the width of the window's top edge. The primary function is to conceal the hardware of the curtain or window treatment but it can also lend to the design. Valances and pelmets are horizontal and can crown full-length drapes or be free-standing. The distinction between the two: Pelmets are made out of solid material such as plaster or wood, whereas valances are always made of fabric. Pelmets can either be plain, painted, wallpapered or padded/upholstered, and can be crafted in a way that complements the architectural design of the space.
Both valances and pelmets can be adorned by adding tassels and trimmings to suit the design of the room and corresponding blinds. They also act as a form of insulation and limit the amount of light that can enter at the top of the curtain.
There are a variety of valance styles to suit any decor. Shown below are a few examples.
Balloon valance is typically composed of light-weight cotton; it has a "ballooned" appearance. lick here to see an example.
Swag valance (also referred to as scarf valance) refers to any type of fabric on the valance that drapes over a window and has excess material on either side. Click here to see an example.
Ascot valance: is a fabric that hangs over the curtains or drapes in a V-shape. It can have a tassel or other decorative element at the point, and is usually made of a high-end material such as silk or velvet.
Styles of curtains
Ring-top curtain
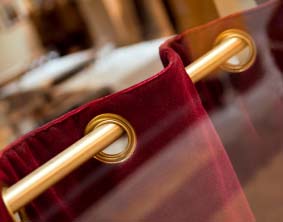
Grommet-top curtain
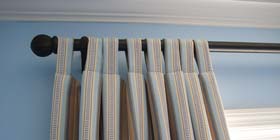
Tab-top curtain.
Picture ©PoshSurfside.com.
Ring-top curtains
Ring-top curtains are the easiest curtains to open and close because the rings at the very top edge of the curtain slide easily across the curtain rod. They don't even require the use of a wand or baton to open or close the blinds.
Grommet-top curtains
The grommet-top style of curtain is very similar to ring-top curtains. The only difference is that the grommet is sewn into the fabric at the top of the curtain. The curtain rod is inserted through the grommets, creating pleats, and the curtain slides easily open and closed.
Tab-top curtains
The top edge of these curtains includes loops through which the curtain rod fits. This can be preferable to the ring-top curtain as they easily slide open and closed and provide a fabric finish.
Rod-pocket curtains
This type of curtain also eliminates the need for rings on the curtains, as there is a casing on the top edge of the curtain the slides over the curtain rod. They completely cover the curtain rod with this slip, as opposed to the tab-top curtain where the curtain rod would still be visible in between the loops of fabric.
Sheer curtains
These curtains are made of a lighter material that provides privacy while allowing light to enter the space. They are often paired with another curtain of a heavier material to create a layered visual effect. The picture shown at the beginning ofthis article has sheer curtains.
Blackout curtains
These curtains are made of a heavier material and are used where completely darkness in the space is desired. Thermal Curtains offer extra insulation. Both of these options are similar in appearance to regular curtains, except the material is thicker or will have an extra layer of lining.
Hanging systems
A track system is required to hang curtains and can be mounted on either the ceiling or walls. There are various types of track systems available and provide a range of functionality and design. Especially with aluminium tracks, there is usually a lipped channel where a sequence of runners is inserted to slide along the track.
Ceiling mounted curtain track
This type of curtain track system is mounted directly to the ceiling. It uses hardware such as brackets and clamps or can be screwed directly into the ceiling. Some available models are recessed into the ceiling. This type of track system is ideal for handing heavier curtains.
Wall mounted curtain track
Depending on the model, this wall-mounted curtain track can either be screwed directly into the wall or with additional hardware. This configuration can allow for the use of either single or double tracks.
Double tracks
This is an effective option for having two sets of curtains, such as a blackout curtain or a sheer.
Aluminium curtain track
As the name suggests, these tracks are constructed of aluminium. They can be coated in different colours. These tracks are the most popular system due to its functionality and durability.
Plastic curtain track
These tracks are often made of PVC or ABS plastic. They act as an alternative to typical metal tracks. They are available in a wide selection of size, color and flexibility.
Flexible curtain track
Flexible curtain tracks can be used around corners, or in spaces that are rounded or curved. For instance, if you wanted to follow the line of a bay window with curtains, a flexible curtain track would be ideal.
Fixed track
This curtain track system is used in conjunction with custom-made drapes. It is measured to the exact width of the window. Motorize the drawing of the curtains via remote control is an option with a fixed track system.
Extendable track
This type of curtain track is perhaps the most popular option on the market as it comes in standard sizes and is also adjustable to fit any width of window. This adjustment avoids having to measure and cut the track to fit and prevents the possibility of an improper cut due to an incorrect measurement. The curtain hooks fit onto the back side. This system is ideal for either cord- or hand-drawn curtains.
Curtain wire
The curtain wire is a hanging system that is an alternative to tracks and rods. It is used for lightweight curtains that aren't opened and closed regularly.
Curtain rod
Curtain rods are the most traditional mode for hanging curtains because the range of options for the design and functionality is extensive. The telescopic curtain rod is a cylindrical rod and has spacers that extend from the wall. The spacers can also allow for more than one rod at a time, if more than one curtain is to be hung.
Installing a curtain hanging system
If you decide to install a system to hang curtains, you first need to decide what system best suits the type of blinds you will hang. There are a range of options available to suit the functionality and design of your space. Each system has corresponding accessories and hardware to match.
To install a rod system, the first step is to measure the width of the window. Once you have this measurement, add five inches in order for the rod to extend past the window. This will ensure that the curtain will completely cover the entire window.
Once you've measured the rod and the position of the brackets to hold the rod, it is important to check the marks with a level. The curtain rod can be installed either on the drywall above the window frame, or directly onto the window frame itself.
In choosing the type of hardware to use for mounting the brackets, it is important to consider the type of surface that the system will be mounted to and use the appropriate screws to ensure sufficient support. Attaching the tracks and brackets to studs or joists are ideal, but if this is not available, anchors provide a sufficient alternative. If you are using anchors, drill a pilot hole that is the same size of the anchor, tap the anchor in then proceed to insert the screw, which will cause the spring of the anchor to activate behind the supporting surface and hold it in place.
When the marks are level, the curtain hardware can be installed. If there are no pre-drilled holes on the mounting track, you can drill holes through the aluminium to line up with the marked holes on the surface to which you are mounting the track. Make sure you use the correct drill bit and measure the size according to the screw you will be using.
Making your own curtains
Making your own curtains provides you with the opportunity to choose a design that is custom-tailored to suit the space. Start by choosing your fabric.
Choosing a fabric depends largely on the design of the space and the desired functionality. There are a full range of options available and materials can be sourced from a fabric outlet.
Here are a few different options to consider:
Sheer and net curtains are made from lightweight material and let in sunlight while providing privacy. Materials used for this type of curtain include sheer cotton, lace, or linen.
Medium- or heavy-weight curtains are more efficient at blocking light and keeping heat in the room than light-weight curtains. Cotton is the most popular choice for material but other possible fabrics include velvet, suede, tapestry and tweed.
Lined curtains will have fabric sewn onto the curtain on the side closest to the window, while unlined curtains do not. The benefit to consider with lined curtains is that this extra lining will protect the curtain from UV damage and add extra insulation.
If you choose to line curtains, you may also want to consider adding an interlining, which is a material (typically cotton) that is inserted between the lining and the face fabric. This will increase the insulation, protect the curtain, and help achieve a professional finish. The easiest way to line curtains is with tube lining because it does not require any sewing; you simply slip the material between the curtain and lining.
An adaptable curtain provides the option of using the curtain system in a non-traditional fashion. For instance, instead of hanging a curtain in front of a window, it could be used to separate a room and stand as an alternative to a wall.
Header tape (also called pleater tape) is a great alternative to measuring and cutting pleats from scratch. It comes in a variety a styles including french, goblet, box, pencil, to suit your design tastes.
Video: How to make curtains
How to make tie-backs
Tie-backs have the ability to complement the design of the curtain with elements like rope, tassels, or clasps. However, their primary function is to hold a curtain open.
It is important to consider the weight of the curtain and choose the material for the tie-back accordingly.
To assess the correct length, take a measuring tape and wrap it around the curtain to mimic the tie-back. Add 1cm to this measurement to account for the seam (if the tie-back is sewn from fabric).
Measuring curtains
Depending on the material you choose, you may need to pre-wash the fabric to account for shrinkage. Otherwise, account for 7 to 9 cm of shrinkage when measuring.
Measuring the width
The window frame should not be used as the measurement because the total amount of fabric you need will have to be enough to cover the entire finished dimension, not just the window. The finished curtain extends past the frame in order to cover the entire window and should be measured according to this.
Measure the total width of the window treatment and divide this number in half.
If there are 1.5cm hems add 5cm to this total. If there are 2.5cm hems add 10cm to this total.
Measuring the length
Measure from the top of the hanging system to where you would like the curtain to end. To account for the top and bottom hem, double the size of hem you plan to have (i.e. add 5cm for a 2.5cm hem, add 10cm for a 5cm hem).
If you choose to have a decorative heading at the top of the curtain, double the measurement depending on the desired size (because the material will be folded in half).
If you are slipping the curtain onto a rod, you will need to account for a pocket. Add 5cm for a 2.5cm rod, add 10cm for a 7-8cm rod.
Cutting the fabric
You will be cutting your fabric with shears or a rotary blade and using pins to secure the fabric to a suitable working surface.
- Once the fabric is securely pinned, place a weight in the centre of the fabric in order to keep it in place when you begin cutting.
- Place the fabric pattern with the side that will be exposed to the room facing up and make sure the edges of the fabric are straight.
- Trace a line at the measurements and begin to cut the fabric.
- To ensure a straight line when cutting, pin the fabric every few inches to ensure a tight hold.
Sewing the fabric
- To sew curtains you will need a sewing machine and coordinating thread.
- Fold the fabric to hide the ragged edge and then once more for the size of hem you have chosen. Iron this line.
- Proceed to sew the hem with a straight stitch.
- Repeat this process for the remaining hems and pockets.
- Trimmings can be sewn onto the edges to add a finished effect and range in design with tassels or beads.
How to make a pelmet
A pelmet can be constructed from a firm material such as plywood or foam core board.
- Measure the width of the window treatment to determine the size of the pelmet. The pelmet should cover the entire hardware that hold up the curtain but should not obstruct the functionality of the curtain itself.
- Trace the pattern and cut the shape with the appropriate tool. Plywood will require a mitre saw but material like foam board can be cut using a box cutter.
- Fasten the pieces together with L-brackets.
- Choose a finish that suits the décor of the space. The types of finish can range from wallpaper, to paint, to upholstery.
- Install brackets in the wall to hang the finished pelmet.
How to make a valance
The type of valance you choose will depend on the effect you wish to create. Elements of the valance, such as the swag and tails, will affect the design.
- First, measure the width of the window and depending how much swag (drop in the fabric), add another 3 to 5cm to this total. If you want a long tail on each end of the valance, add that amount to the total as well.
- Fold the fabric in half (lengthwise) and again four more times. Iron a foot in on each side of the fabric.
- To create staggered ends to the tails, make a diagonal cut across the two short ends.
- Pin the long edges of the fabric and sew this length at 2cm.
- Backstitch both ends of the fabric and flip it right-side out.
- Pin the edges inside the fabric tube and sew these edges together. Repeat this on both sides to achieve a long tube of fabric with diagonal edge.
- Divide this long piece of fabric into 3 sections. The middle section will be the swag and the two end pieces will be the tails.
- The valance can then be attached to the curtain rod.
How to Install a Swag Valance (by Blinds.com)
Further reading
Window dressings. Seven rules for window dressings. This article covers curtains, blinds, awnings, sun-shades, shutters and venetian blinds.
Colour wheel tool. Use this tool to help you select a colour scheme for your home. (This colour tool should ideally be used after you've read the following two articles.)