Timber flooring is a great way to add an elegant and clean look to any home, traditional or modern. Installing a wooden floor is not as difficult as it may sound and can be easily applied over an existing concrete slab. By following these DIY steps you will get your floorboards down in no time.

Step 1: Measure the room
The very first thing you need to do is measure the height of your ceilings and door openings to ensure your rooms can take the increase in floor height.
The Australian BCA requires that all habitable rooms like bedrooms, dining spaces and entries have a minimum floor to ceiling height of 2400mm. This may vary if you have raked ceilings.
Standard door opening heights are 2040mm, if the new flooring reduces this height then all the doors in your home will need to be shortened to accommodate the new floor thickness.
You will need to measure the existing floor to ceiling height and subtract the thickness of your flooring and underlay from this. If it works out that your floor to ceiling height is less than 2400mm your rooms may not comply with the Australian Standards for habitable spaces and it is possible that you will have trouble selling your house in the future.
Once you have measured your ceiling heights and know that your home can accommodate the thickness of the new flooring you can measure up your spaces.
A measurement of all spaces is needed to determine the number of wood floorboards required to cover the concrete. However, you first need to determine the direction of the flooring. If you choose to lay engineered floorboards or regular timber boards against the longest wall that is over 5 metres long you may need to factor in an expansion joint in the length of this area (ensure you check with the manufacture or reseller). If your space is longer than 5 metres and expansion joint in not installed your flooring may buckle at the ends during periods of high air moisture content.
Measure the length and width of the floor area before you purchase your flooring, and allow for 10% wastage. Subtract 15mm for expansion if required on the length and width dimensions. Divide these measurements by the width and lengths of your wood flooring and this will give you the number of boards or courses for the floor.
Once you have purchased your timber flooring allow the boards to acclimatise to their new location. Store them in the space they are to be installed for the duration that is specified (this maybe a 6 week period). The moisture content in the air can play a significant role in activity of your floor. This may not be important for engineered boards but is essential for regular timber boards (check the installer specifications or ask the reseller).
Step 2: Choose the right flooring and coatings
This can be the most difficult part. There are hundreds of choices:
- Hardwood or Softwood
- Various Wood Types i.e. Timber, Bamboo etc.
- Various colours
- Different Grades
- Board sizes
- Differing floor thicknesses (this may affect your current ceiling heights)
- Differing underlay thicknesses
- Differing coating types
If you are looking at install a floating floor, take a look at engineered hardwood flooring. This type of flooring is a new generation of timber flooring that uses cross engineering to create a three-layered floorboard, resulting in longer and wider boards, than traditional solid floorboards. However if you are look for a cheaper alternative that is 73% harder than Jarrah, then Bamboo flooring is your best option.
Also remember who is going to be using your floor and what may work best for them (for example softer timbers for toddlers).
Step 3: Preparation
Floor
To make sure the adhesive will stick to the concrete, you will need to make sure the concrete does not have any paint, lumps or debris. By using a concrete grinder, you will be able to remove any paint or imperfections. Before using the grinder, make sure you read the safety instructions and wear the appropriate safety gear. Once you have finished, sweep the dust and remaining debris. Using a shop vacuum to remove fine dust particles is also a good idea.
Doorways
The bottom of all the doorways needs to be trimmed in rooms where the floorboards are installed. Take a paper template of this area and transfer it onto the timber board by drawing hard over the template onto the piece of flooring.
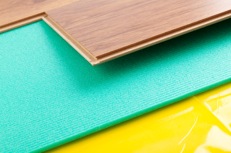
Step 4: Underlay
You need to install down an underlay over the concrete floor before installing any type of floor including engineered flooring. The underlay is used to dampen sound and to cushion the floor.
Firstly roll out the underlayment so it covers the entire floor. Trim the underlay to the edge of the wall with a utility knife. If you have seams then seal them by using the specified tape.
Secondly roll the underlay back to one metre off the opposite wall and start applying the adhesive glue as per the specifications and roll the underlay slowly back over the glued concrete.

Step 5: Lay the floorboards
Set the first piece of flooring 15mm off the wall, held in place temporarily with a 15mm thick timber spacer block. The tongue side of the board should be sitting against spacer blocks. The spacer blocks will be taken out once the entire floor is installed and are used to allow for expansion.
Take each piece of flooring and put a timber block at the back of the board and then use a rubber mallet to tap the board tongues into the backs of the grooves of the next board. Add spacers as you set the first row of flooring in place.
A pull bar can also be used to push pieces of flooring together. Cut the flooring with a mitre saw to complete the row. A circular saw can be used but it does not cut as neatly.
You can use the leftover piece from the previous row to begin the next row. This will ensure that you have no matching seams or joints. Don't forget to allow the specified expansion joints all the way around each room.
Step 5: Complete the last row
The last row of the flooring may need to be cut to a specific width. Make sure to measure from the end of the floor to the wall with a spacer in place for expansion. Cut the number of boards you will need to complete the last row.
Step 6: Sealing
Many modern engineered types of timber flooring will not need a final coat to protect their surface. Traditional timber boards however will require a finishing coat to protect the surface from impact, wear and staining. Polyurethane is the most cost effective and easy to install coating and can also take a coloured tint if required. Polyurethanes come in gloss, semi-gloss and matt finishes.
Step 7: Maintenance
The easiest way to maintain a timber floor is to mop it once a week with mild soapy, warm water. There are also many other options on the market to suit specific floors, but is it is wise to speak with the floor company you purchased your floors from, about what is recommended for the maintenance of your particular flooring.