Avoid future pain:
use galvanised steel fixings
When you are building a deck, pergola or something similar, there are some very common mistakes that can be made in the construction process. This article will cover some of the most common mistakes made. DIY gurus right through to building professionals have been known to commit these errors of building practice. With some simple advice, you will be able to both recognise, and avoid these simple mistakes. Knowledge of the pitfalls can avoid heartache with your project.
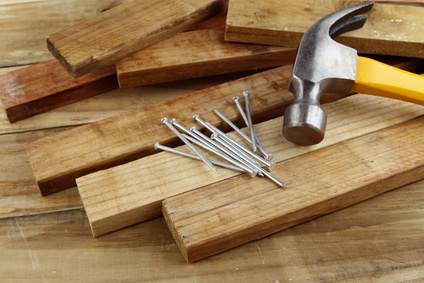
#1 - Bolts, nails & rust
Steel fixings of any sort (nails, bolts, screws etc.), need to be galvanised. Galvanised steel is coated in zinc. Galvanised fixings have a dull grey appearance. Galvanised fixings do cost more, however if you do not use them your deck may be in need of major deck repairs in a year or two. The zinc coating protects the steel from the corrosive chemical reaction that naturally occurs between steel, moisture and the tannins in timber.
#2 - Councils having decks removed
Not getting council (local government or shire) approval for you deck can lead to heartbreak if they decide to enforce the rules. Be sure you get the right information and approvals for your project before you begin building. A council has a right to force you to change, alter or even remove your deck completely if you do not follow their guidelines.
#3 - Decking boards not straight
This is not a structural problem, but it is unsightly, unprofessional and screams DIY.
The simplest way to lay decking boards straight is to install a grid board (every fifth board) to a straight line. To get your straight line for your grid boards use a chalk line to mark out where they go. A chalk line is a string line covered in chalk, and when flicked against the timber, it leaves a straight line that can be used as a guide. From here, nail off all your grid boards completely. Now go through and install the remainder of the boards using timber wedges cut from decking off cuts (off cuts are the left over short pieces of decking) to evenly space the boards in between the grid boards.
#4 - Roof leaks
Surprisingly, the most common leaks come from roof screws being over tightened. In the process of over tightening the roof screws, the rubber washer that is meant to seal the roof sheet gets damaged. Consequently, the damaged washer doesn’t seal the hole that the screw has made, allowing water to enter.
#5 - Ceilings that sag
Sagging ceilings are often due to ceiling supports that are installed too far apart. When the ceiling was installed it may have been straight and flat, however after six months damp air will soften the ceiling sheets. This causes the ceiling to sag and have a wave effect if they don't have enough supporting structure. Always install your ceiling sheets according to the manufacturer’s instructions.
#6 - Hitting underground services (gas, water, electrical)
The consequences of hitting mains of any sort could be anything from annoying, to serious injuries or worse, not to mention the potential costs involved in repairing them. You need to call 'Dial before you dig' on 1100 (within Australia) before you begin work. You will also need to contact your local service providers as well as your local council/government. This way you can double check all the available information.
When the time comes to dig your footings, dig them using a shovel and crowbar. We recommend that you dig them by hand with limited force so that if you are unfortunate enough to hit a service of some sort, you greatly reduce the chance of damaging them.
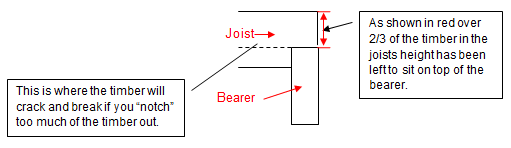
#7 - Timber cracking and breaking
This happens most often because too much timber has been cut out of the piece of timber being used. There is a rule that more than 1/3 of the timber should not be removed, and even experienced builders can get caught out here. If you need to notch in a floor joist, for example, over a bearer, you must have at least 2/3 of the timber sitting on top of the bearer (see diagram below). If you need to cut more than 1/3 of your timber floor joist out, you will need to consider adding some additional supports. If this does happen it is best to call your engineer for advice.
#8 - Sagging decks
Aside from too much timber being cut out as mentioned above, most of the time, sagging decks are caused by incorrect timber type or timber sizes being used. If you have an engineer design your deck, you should not have this problem. This is where most DIY builders can go wrong. There are two main types of timbers, softwood (all types of pines, etc) and hardwoods. As the name suggests one is stronger than the other. You can swap softwood with a hardwood and not have a problem, but keep in mind that you must use structurally rated timber. However, if you go the other way and swap hardwood for a softwood (usually done in an attempt to save money), this can lead to major problems, like having your deck collapse.

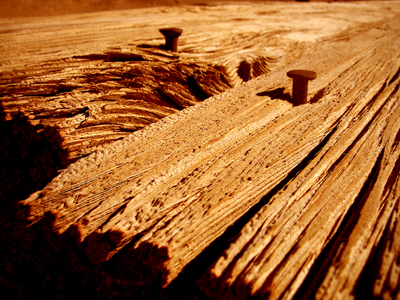
#9 - Black stains on decking boards
Black stains, as in the picture below, are caused from metal grinding sparks hitting the deck. So don't do any metal grinding or drilling on or near your timber deck. This blackening occurs when the metal fragments are not cleaned off the deck properly and the deck then gets wet. The black is caused by the tannins (sap from the timber) reacting with the metal when they get wet. The best solution is not to use a grinder on your deck, and do not leave any metal lying around on your deck. Always sweep your deck down every day after completing construction work for the day.
#10 - Rotting timber posts
Timber posts, set directly into concrete, are much more liable to rot. You may see TV shows do it, but it is not a practice that should be followed. When timber gets wet and damp for long periods of time it suffers from fungal attack, which causes the timber to rot. When timber posts are set directly into concrete, the timber is liable to remain moist, as concrete is porous and absorbs ground moisture. This creates the perfect environment for fungal attacks. This is the same for gardens built around posts as well. The timber absorbs the ground moisture and never gets a chance to dry out and thus the rotting starts. The best example of this is old timber fences. Observe where they rot out? It’s nearly always at the ground. So always use post stirrups to separate your timber posts from the ground.
#11 – Deck subsidence (sinking deck)
This happens due to poor footing (concrete foundations) construction. Mostly it is due to the hole being dug too small and the loose dirt has not been cleaned out of the hole correctly. When you dig your hole, make sure they are dug straight down, and it is best to dig your holes a little bigger than required. If you don’t clean out the loose dirt, over time this loose dirt will compact, which has the potential to cause your deck to sink.
Also, it is advisable never to bolt your deck to untested concrete paths or similar, in case there is no steel reinforcing in them. If there is no reinforcing, it is likely the concrete will break and fall away, taking your deck with it.
#12 - Grey deck boards
This is caused, 9-out-of-10 times, by a lack of maintenance. All timber requires an initial protective coating, and if the timber is located outside it will required reapplication at least every two years, depending on what product you use. When a deck gets really grey it needs to be sanded, cleaned up and then recoated, which is a very expensive way to go about it. If you have your deck coated every 12-18 months you will avoid this expense.
As you can see, these mistakes are easily made and can be easily avoided.
About the author
These tips were shared with you by Matt Shutkowski creator and author of HowTodecks.com.au. Matt is an Australian builder with over 12 years experience.