
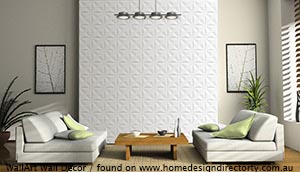
 For years Gyprock has been seen as the standard wall lining in the typical Aussie home, but there are other options and you can DIY. Until recently there has been a limited selection of interesting internal wall linings and many people are still unaware of the other options. Three dimensional (or 3D) wall linings are now available in Australia and it's easy to install.
Product overview
3D wall linings generally come in large light tiles (600x600mm). 3D wall linings are typically made from environmentally biodegradable products such as crushed sugarcane stalks, coconut husk or recycled products.
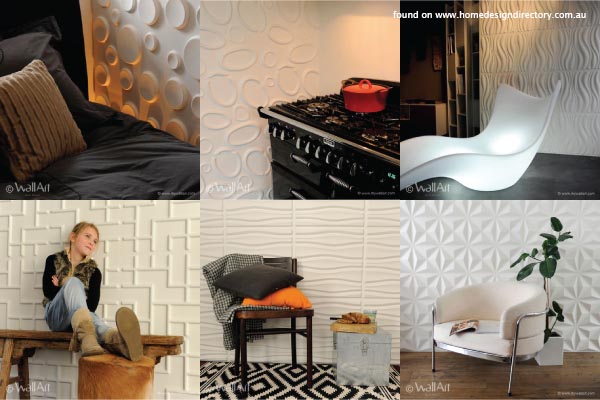
These 3D patterned tiles are easy to work with and when the panels are butted together horizontally and vertically they form part of a larger pattern. It's similar to installing wall paper accept you are working with solid, smaller and less cumbersome pieces.
Once the tiles are trimmed and glued to the wall, the joins then need to be filled and then sanded back. Getting the tiles to form one large pattern is easy as the designs have simple join detail. After installing the product and the plaster has dried for 24 hours the wall can be painted.
Keep in mind that 3D wall tiles are very decorative so it is advisable that you only feature one wall within a room. On the other hand: any 3D walling product will help with noise reduction in a noisy area. So having 3D wall paneling on more than one wall can have benefits.
As the product is decorative it is advisable to tone down on your colour choices otherwise the wall may 'over-dominate' the space.
Instructions
1. What you will need
Below is a list of items for installing and finishing 3D wall tiles:
.jpg) Damp cloth
Damp cloth- Bucket of water
- Stanley knife
- Sandpaper (350 grade)
- Spirit level
- Pencil (for marking)
- Metal rule (to aid with cutting)
- Plastering filler
- Primer paint
- 2.4m long 2x4
- Sealer
- Paint (for final finish)
- Adhesive (for gluing tiles to wall). There are a few options: contact adhesive spray, Liquid Nails (water based) and double sided tape
2. Wall preparation
.jpeg)
The final finish relies greatly on the surface preparation. The walls must be made clean and smooth before the tiles can be installed. Here are a few tips:
- Clean surface - Clean the wall surface with a dry wide paint brush or cloth. Ensure the surface is dry, smooth and free of loose debris.
- Fill holes - All large holes or major damage that could interfere with installation must be repaired prior to installation. Smaller holes that are 15mm in diametre or less can be hidden (unfilled) below the tiles.
- Rough up surface - If you are installing tiles over glossy paint rough up the surface with sandpaper to dull the finish and create a jagged surface for bonding.
- Allow drying time - Allow 24 hours for drying if the wall has been wet in any way.
2. Tile acclimatisation
As most tiles commonly consist of natural plant based products the tiles need to acclimatise to the local temperature, just like timber flooring. Unpack you tiles and ensure your tiles sit for at least 48 hours to allow as much air as possible to flow around the product. Ensure all windows and doors are closed (moisture absorption from rain should not be encouraged at this time).
If you have a tile that is slightly warped don't panic. Most tiles are manufactured to flex a little and you can flatten them out during the installation process by hold them flat against the wall with pressure for the recommended time.
3. Design ideas
.jpg) Think about design - You must determine if the installation will be a wall-to-wall installation or a featured paneled area with a boarder around. You can centre a group of tiles in the centre of your wall or have a single strip running from one wall to the next. To ensure you will be happy with the installation before you start gluing you can lay the tiles on the floor and draw a grid on the wall (the same size as the tiles) to help you decide.
Think about design - You must determine if the installation will be a wall-to-wall installation or a featured paneled area with a boarder around. You can centre a group of tiles in the centre of your wall or have a single strip running from one wall to the next. To ensure you will be happy with the installation before you start gluing you can lay the tiles on the floor and draw a grid on the wall (the same size as the tiles) to help you decide.- Working around power points - If you are cutting around power points (GPO's) or light switches, backing plates can be added to the the back of points and switches to lift them from the wall - allowing the products edge to be concealed. Ask your electrician about this option.
- Installing boarders - Cut panels can also be concealed using aluminium/timber borders. Any material can be used as a border even a recess - offering a very modern shadowline.
4. Painting (stage one)
Pre-priming the tiles will help protect the product during installation, but the preparation time will be longer as the tile will need time to dry completely before installation. If the tiles are to be primed before installation, be sure to prime both sides. If only one side is primed the tile will absorb the moisture from the primer and will buckle and warp when drying. It is fine to prime only one side if the tile is already glued to the wall as the glue will hold the tile fast to the wall.
5. Set out
.jpg)
There is nothing worse than viewing small cut tiles, but if you're covering an entire wall you will most likely need to cut some tiles. Having a set out point will ensure that cut tiles are less visible. The most visual point on the wall is where your set out point should be. To find the most visual point on the feature wall arrange your furniture as it will be with the new feature wall in place. Walk into the room and mentally note what part of the wall you are visually drawn to first. It maybe a window, or where the walls meet the ceiling or a recess in the wall. This will be your set out point and where you will start using full and uncut tiles. Can you image if your cut tiles were in this highly visual location? It could accentuate a feature that you may not wish to highlight.
6. Installation
We now have a set out point, so keep your spirit level, tape measure, piece of 2x4 and pencil handy.
- Mark out a vertical and horizontal starting point with your pencil and 2x4 and ensure these lines are level with your spirit level.
- You now have a marked out starting point that is level. Take your first tile and apply adhesive as suggested by manufacturer and line the tile up with your pencil lines. Press down firmly for at least 10 seconds. This first tile will act as a guide for the following tiles ensuring that your tiles will be laid straight from here on. For permanent installations we recommend the use of either contact adhesive spray, Liquid Nails, double sided tape or possibly a combination of these. Always follow the manufacturer's instructions for adhesives as they will know best what adhesive bonds best to their product.
- Take your second tile and butt/marry the second tile into the first. Take care in making sure the tiles are butted as tightly as possible to one another. This will help minimize noticeable seams. Keep a damp cloth handy to wipe off any excess glue after each tile installation. NOTE: Don not 'over-wipe' unprimed tiles. Too much moisture and rubbing can cause small amounts of pulp to lift from the tile - creating small balls of pulp.
7. Cutting the tiles
.jpeg) The tiles can generally be cut with a Stanley knife. Make multiple passes on the tile using your metal rule to keep straight and cut deeper with each cut, this will help to ensure a straight cut. After cutting, use 350 grade sandpaper to lightly sand the cut edge.
The tiles can generally be cut with a Stanley knife. Make multiple passes on the tile using your metal rule to keep straight and cut deeper with each cut, this will help to ensure a straight cut. After cutting, use 350 grade sandpaper to lightly sand the cut edge.
8. Filling gaps
Ensure you are happy with the tile adhesion to the wall and check that all tiles are secure and not drummy. Fill any gaps between tiles with the plastering filler. Wipe off excess filler with your finger. Don't worry if you remove part of the filler as you can reapply again once the product has dried and remember to clean off excess as you cannot sand come gap fillers. Allow to dry as recommended then sand back entire paneled surface with sandpaper.
9. Painting (stage 2)
The wall panels are now ready to be painted. If you have followed the wall preparation steps you should now have a tiled wall ready to accept paint. The tiles can be painted with either a brushed, roller, or spray gun, but speak with the reseller about the best way to paint the pattern you have bought.
The idea of installing a 3D wall may seem overwhelming but the result is worth it. By following the steps above you could be installing your own feature wall this weekend.