DIY Deck
You can do-it-yourself: building a timber deck is really not that hard if you keep it simple. Even if you know nothing about construction this article is for you. This guide will enable you to construct a deck that functions well, is cost effective and durable. There are 6 critical steps you will need to follow to design and build your own timber deck.
Step 1: Initial research
There is nothing like research. Have a good look around our website. There are many articles that will help you understand the process of construction. See our list of construction articles as a starting point.
Research allows you to discover helpful alternatives in materials and methods which can prevent issues further down the track. We have described a couple of alternatives for you below.
In addition you should research the cost of building a deck before you begin. This website provides a handy (and free) Deck Cost Calculator for just that purpose. Note that the calculator assumes you will be hiring a builder, so use lower per-square-metre rate.
Composite decking - a timber decking alternative
For many homes in bushfire prone areas timber decking is not an option, due to its combustibility. If your home is in a bushfire prone area or you want a maintenance free timber deck you may like to try a timber composite product. These products are usually comprised of PCV, timber dust and glue. An example of this is Timberlast decking. It is made of recycled HDPE and wood fibre. The Timberlast product is made to last and will not rot, splinter or require painting or oiling. It is slip resistant, fade free, easy to install, and the product looks like regular timber decking.
Composite decking products are also perfect for the DIYer.
Underdeck waterproofing
For many houses that have decks on top of one another waterproofing the lower deck can be tricky. In the past if a home owner wanted to waterproof a lower deck 'Colorbond' was fixed to the underside of the upper deck. This method has many disadvantages: 1. Gutters needed to be added to dispatch rainwater, and, 2. it is permanently fixed (so if something drops through the decking above it will be difficult to retrieve).
There are now under deck ceiling systems on the Australian market that not only waterproof a lower deck but can also redirect rainwater and are easy to remove quickly if required. 'Underdeck' is an under-deck ceiling system that works extremely well and is cost effective. This product is watertight and is easy to install. Learn more about 'Underdeck' here.
More tips for the initial research phase
(a) Depending on your local council requirements, you may need council approval for your deck. Generally, a deck that has a floor level higher that 900mm off natural ground will require council approval. Council can also tell you if your property has any areas that restrict development. These are commonly known as easements and set-backs.
For simplicity we will assume the deck is square and has a floor level no higher than 300mm off ground level, thus not requiring a balustrade.
(b) Do some visual research. Have a good "Google" around, keep your eyes open when you're out and start to consider what style of deck would best suit your home.
(c) Analyse your needs and write a list. For example, the deck may need to be:
- large enough to fit a 6 seater table with enough space to walk around chairs while people are seated
- have enough space for the kids to ride their bikes and skateboards
- protected from the westerly sun
- protected from rain and have a roof, or be partially roofed
- sunny in winter and shaded in summer
- well ventilated
- private
- quiet
- easy access to the kitchen and living space
(d) Draw a simple plan of your house including all external wall lengths and internal space dimension that will have an important relationship to the deck, such as the kitchen and living space.
Step 2: The initial and developed designs (to scale)
As a guide you can follow our article Designing Your Own Home. It has similar steps.
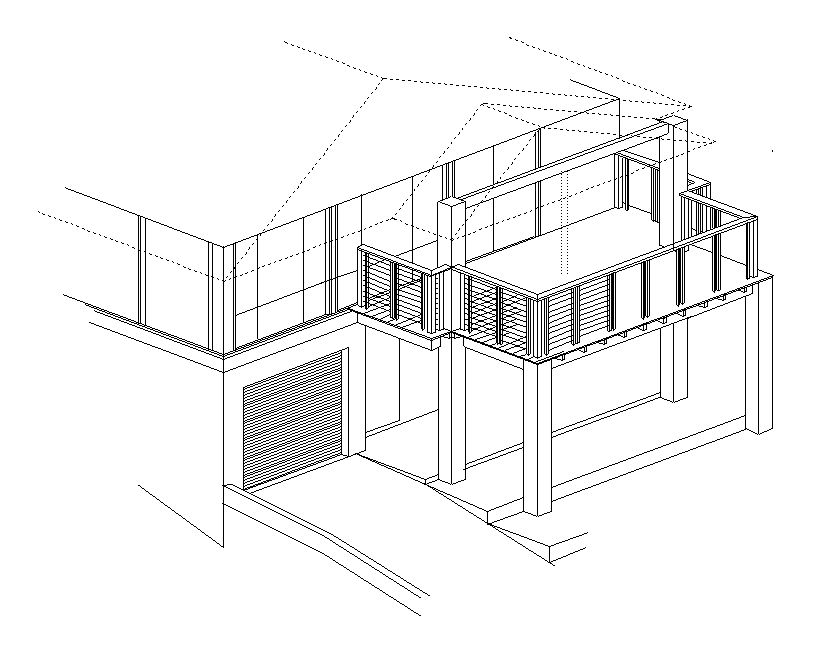
Before you begin
Sit down together with your list of requirements, your visual research and the simple plan of your house. The next step is the tricky bit. You now need to think about all these element together to create the design of your deck.
The best place to start is the siting; the location and orientation of your deck. The best place for your deck is not necessarily where there is plenty of space. This is often the wrong spot and could result in a deck that is barely used.
Look at your list and ask yourself "Where on my house plan is there space that meets my list of requirements." You will probably find that no space immediately meets all your requirements, so work with the location that ticks most of the boxes.
Orientation
Orientation is really important. A deck works best for all seasons if it is located on the north to north/east side of your house. This means it will get good sun from morning (sun rising in the east) to the afternoon (sun setting in the west). Decks on the south and west sides of your home will give you extremes in temperature in seasons where they are not wanted and can also make your house hotter by transferring reflected heat into your home.
Location
Locate your deck off your everyday living space. Analyse what space you spend most of your daytime in. It is usually the family/kitchen area. If this area is on a corner of your house, choose the side with better orientation, even if it has less space for a deck. Remember that for a deck to be useable it needs to be a minimum of 2 metres in depth.
Note: you may need to wrap the deck around a corner of your house.
Also remember that you can not locate your deck any closer than 1 metre from any side boundary fence. If you are thinking about having your deck on a side boundary, keep in mind privacy retention. Since your deck will not only be close to the fence but also higher; views into and from your neighbour’s space should be considered. Chat to your neighbours about what you have in mind and if privacy becomes an issue, add a screen to the design. For more information see our article on external privacy screens.
Once a location has been decided, you will need to ensure there are no services such as plumbing and electrical running in this area.
Design
You are now ready to design your deck. Draw an initial plan of your deck onto a copy of your house plan. Note door and window locations and any easements and set-backs.
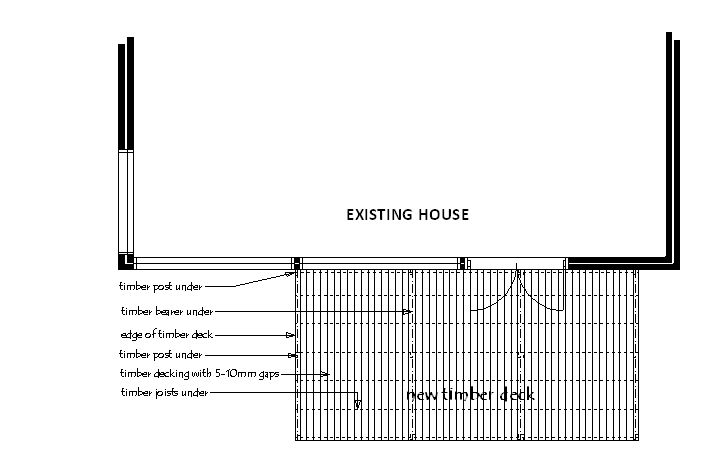
Your plans need to show the following:
- Two scale dimensions of vertical and horizontal elements
- Vertical levels of balustrades, floor levels and ground levels
- Drawing detail including balustrading, steps, supporting post locations or built-in seating
- Balustrades are only required for decks with floor levels over 900mm above ground level. But for safety it is wise to balustrade all decks higher than 1 metre
- Avoid adding stairs to your deck unless you are up for a challenge
Design a deck is something you could undertake yourself or you could engage a draftsperson to draw it for you. If you don't engage a draftsperson you will need to consult an engineer to specify the size of the timber members required for the job. Don't panic - this should not be expensive for a basic deck.
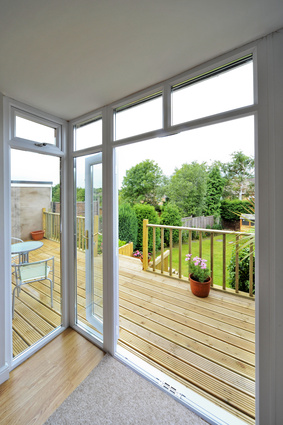
Step 3: Site preparation
Once you have a clear plan you will need to prepare the site. Take note if there are any significant trees species or trees over 3 metres high. These may need to be preserved because of council restrictions. If you are unsure about this, check with your local council. You can build decks around trees - and it often looks fabulous.
Clear the site of trees, bushes, roots, structures and mow or remove grass. Clearing the site makes set-out and construction easier.
Get the tools you will need:
- string line (a long piece of string on a stick)
- short timber takes (1200mm long)
- tape measure (at least 8000mm long)
- hammer
- thick and dark pencil
- spirit level
- spray paint can
Other materials that you will need are:
- One long piece of straight timber (45x95mm x 6000mm) for creating straight lines
- electric saw
- nails or screws
- spade
- timber decking boards. (The choice of timber grade, type and sizes will be up to you and the engineer.
- timber joists
- joist & bearer connector plates
- timber bearers
- timber posts (1200mm long)
- ready mix concrete.
IMPORTANT NOTES:
Make sure you have the correct materials for the job to prevent things like premature corrosion, wood rot and termite damage.
- Do not use standard treated pine for decking on the southern side of your home as it will be prone to wood rot.
- Ensure that your deck is built using galvanised or stainless steel connectors such as nails. Un-galvanised nails react with many external timbers causing them to rust. Stainless steel connectors are only used for builds in highly corrosive locations like beach front and industrial locations.
- Separate the bearers and joists with plastic separators if possible to prevent premature wood rot between these members.
- Most timber decking in Australia is now sold with machined ridges on the under side. This allows air to move between the members and prevents wood rot.
Step 4: Setting-out the area.
1. Location set out
Mark the length and position of the deck on the wall of your house with a pencil. You will need to mark the finished level of the deck floor on the house cladding. The deck floor level should step down from the internal floor level by at least 75mm to avoid waterproofing problems that may occur due to driving rain. There are ways to construct a deck floor level the same internal floor level, offering a seamless entry, but this is best left to the professionals.
2. Horizontal set-out
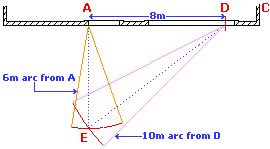
To set out the shape of your deck, measure the depth of the deck off the house wall with a string line and locate a timber stake in the ground for all corners of the deck. Wrap the string around each stake.
Now check that the deck is square. For a simple square deck you will only need to make one triganometric calculation (see free calculator software here). This is to ensure that your deck runs off the house at a 90 degree angle. Using the calculator enter in the length and depth of the deck. This will calculate the hypotenuse. Use the length, depth and hypotenuse as noted in the image above and confirm the position of the corner set-out stakes.
3. Vertical set-out
Once the horizontal set-out is complete, the vertical finished deck level can be set-out. Vertical set-out is important to ensure the step down from the house to the deck is sufficient. It acts as our starting level. The height of all other deck members including decking joists, whaling board (or ledger - it attaches the house to deck), bearers and posts will all be governed by this vertical level.
Take the long straight piece of timber and prop-up it against the house at a 90 degree angle along the string line, with the long piece of straight timber (95mm end) sitting vertically. Ensure the top of the timber is lined up with the deck floor level marked on the house cladding. Hold the other end of the timber out from the house 90 degrees, place a spirit level on top of the timber and move it up and down until it is horizontal (the bubble in the level is in the centre). Adjust the string line on this corner post to this correct level.
Do the same with the opposite string line. Now you have a set-out of your finished deck level. Anything you now construct will need to stay within the confines of this set-out area.
4. Mark out the locations of your posts...
Now mark out the locations of your posts, centre to centre. Use spray paint for this.
Step 5: Construction

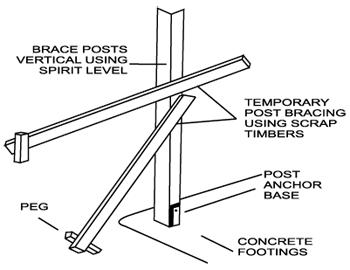
An alternative method of setting & bracing a post
1. Footing and footing holes
The simplest type of footings are concrete pad footings. Dig square holes approximately 350 x 350 wide x 450 mm deep. Empty enough dry concrete mix into the hole to fill it. Add water slowly as per the instruction on the concrete pack. Mix the water and concrete together quickly with a shovel until all the dry concrete mix is a wet but not sloppy.
Once you can see the concrete start to thicken place the post in the hole, push them down as far as they will go and hold the post until it stands on its own. Now you must work fast, for your concrete will start to set quickly.
Check that your post is completely vertical by holding your spirit level vertically on all four sides of your post. Move the post a bit until all sides of your posts are perfectly straight (with the spirit level bubble in middle). During the placement of each post ensure that your posts stay lined up with each other by checking their position with a string line or the straight piece of timber.
Allow your posts to sit untouched overnight or until the concrete has cured.
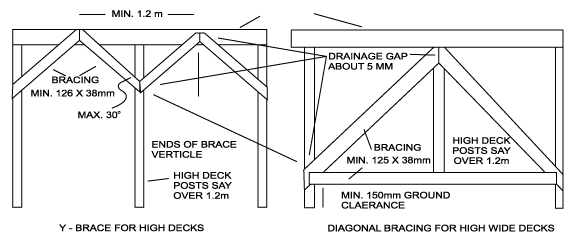
Bracing techniques for high decks
2. Laying down the bearers.
There are two ways of laying bearers. The bearers can be attached directly onto the side of the posts using structural bolts, or the bearers can be notched into the posts using a chisel, then bolted into the post. The first method is easier, it just costs a little more (for the bolts) and is fine for a deck that's only 300mm off ground level. Most professional builders will use the notching method because it produces a better quality deck.
Attach your bearer to the posts with at least one bolt per post. (Your engineer will note this on his plans). Start with the post closest to the house. Ensure that the bearer is at the correct level so that there is enough space above for the joists and decking to meet the floor level that you have decided upon.
Now get your spirit level, place it on the top of the bearer, and move it up and down a little until it is horizontal. Once the bearer is level, attach it to the last post with the bolt. Now you are able to easily fix all the other bearers.
Note: If you intend to cover your deck with tiles you must provide a fall from the house to the outside of the deck to prevent rainwater entering your home.
3. Laying the joists.
The engineering drawings will note how often and at what centres you must lay your joists on top of your bearers. Normally joists are laid across and on top of the bearers at 450mm centres and then fixed with a galvanised connector plates. Space and fix your joists as required then prepare for the laying of the decking boards.
4. Laying the deck
Laying the deck takes a great deal of patience. If using nails, consider hiring a nail gun. You need to nail the boards, with ridges down, twice at every joist.
If you are using a timber that is prone to lots of movement and splitting it is wise to drill all ends of the boards and screw them down to the joists.
If your deck is unprotected from rain you will need to provide spacing between the boards of about 5 to 10mm. You will need to use a spacer of some kind so that the boards have a consistent distance between them. There are probably purpose-made spacers that can be purchased at your local hardware store but you can just as easily use a bolt or piece of wood that has a thickness of between 5 and 10mm.
Ensure your nails or screws are consistently in the centre of your decking board. Use a string line if necessary.
The connection between your deck and entrance into the house should be scrutinized by a professional to ensure that waterproofing issues have been considered.
5. Painting or Sealing
The deck should be coated with something that will help protect it from the sun, rain, and attack by fungus. An oil-based coating will enhance the appearance of the timber, stop it splitting, and extend the timber's life. However, the deck will need to be recoated every year or two. Painting offers a longer period of protection (up to 10 years).
It’s a good idea to get expert advice because there are many types of timber finishes on the market.
Step 6: Certification
No matter who builds your deck it will need to be checked by someone with technical or building knowledge. The engineer who designed it is the best person to certify it.
Undertaking the construction of a simple deck can be a rewarding experience, however if you are looking for a professional, take a look at our directory of local.

