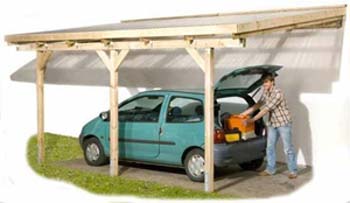
Image courtesy of Garden Planet
Building a carport which is attached to an existing structure is relatively simple because bracing of the structure is simplified. However some skill in handling tools and larger pieces of timber is desirable. Generally, you should consult the local council about the acceptable height of the structure, distance from front and side boundaries and other local regulations.
Required tools & materials
Tools
The following list of tools are required: saws, hammer, carpenter's mitre square, measuring tape or rule, string line and level (a plumb-bob would also be useful), spirit level, drill and bits, spanners, tin snips for roofing and a masonry drill (for brick wall fastening).
Timber
Softwood or hardwood is acceptable.
| 100 x 100mm | Softwood or hardwood - durable species required |
| 150 x 50mm | 4 pieces each 2.4m dressed all round DAR (for posts) sawn timber |
| 200 x 25mm | 2 pieces 6.0m (beam and ledger) 8 pieces 3.0m (rafters) primed fascia board |
| 100 x 38 mm | 2 pieces each 3.3m (front and rear fascia) sawn timber |
| 75 x 38mm | 2 pieces each 1,2m (knee braces softwood roofing battens, sufficient for five (5) 6.0m runs along the roof line |
Hardware
| 7/125 x 9mm | Galvanized coach screws, OR fixing ledger |
| 7/100 x 12mm | Galvanized expansion bolts to wall |
| 8/100 x 9mm | Galvanized round head bolts, nuts, washers (beam to post) |
| 4/75 x 9mm | Coach screws (knee brace to post/beam) |
| 28 x | Galvanized framing anchors (14 left, 14 right) with necessary flat head nails. |
| 4 x | Post anchor bases or stirrups to choice to fit the 100 x 100m DAR (for posts) |
| 50/75 x 3.15mm | Bullet head nails (skew nailing rafters as required) |
| 50/65 x 40mm | Galvanized bullet head nails (fixing fascia) |
| 50/75 x 2.8mm | Flat head nails (fixing battens) |
and...
- Galvanize fastenings for post anchor bases or stirrups.
- Roofing material to choice, in 3.0m continuous lengths. Fastenings as recommended for roofing.
- Roof guttering, 6.0m length, plus stop ends and downpipe as required.
- Brackets and fixings for guttering, etc.
- Barge moulding of zincalume 2/3.3m lengths Flashing if required (carport roof to existing structure).
Consult your TABMA merchant for suitable available materials and how these can be ordered.
Design of carport
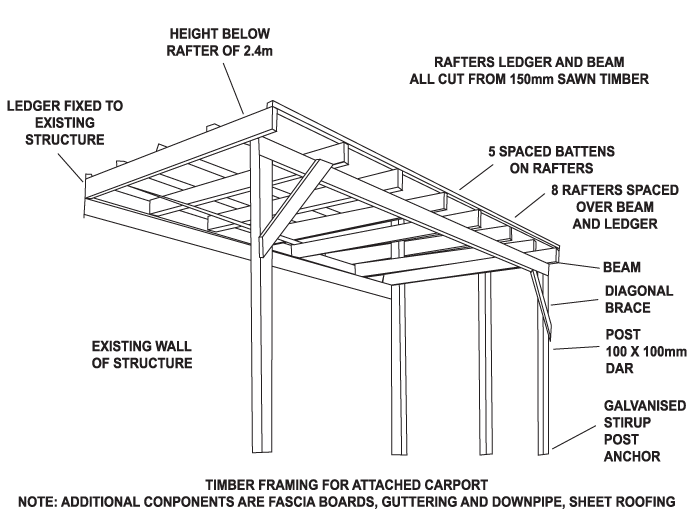
This design for a carport gives a covered area of approximately 6.0m long x 3.0m wide with the minimum under rafter clearance of 2.4m. Essential bracing front to rear is provided by diagonal or knee bracing while side to side bracing is achieved by firm attachment to existing structure.
This two-way bracing is required because the supporting posts are fixed to fabricated galvanized components (stirrups, angle or post anchor bases) which are available from many building material merchants.
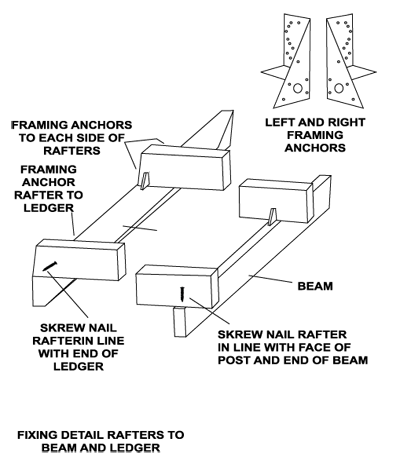
Roofing material suggested is lightweight corrugated or other roll formed sheet zincalume or aluminum. This roofing should be fastened to the battens using the maximum number of fasteners as recommended for high wind areas by the manufacturer of the roofing material. For this reason the rafters are firmly fixed to beams and ledger using nails and standard galvanized framing anchors to each rafter/beam junction.
A general recommendation is that all timbers in the carport which are exposed to sun, and especially to rain or dew, should be given protective coatings (paints, stains or pigmented finishes) which should be maintained regularly.
Construction process
Laying out the site
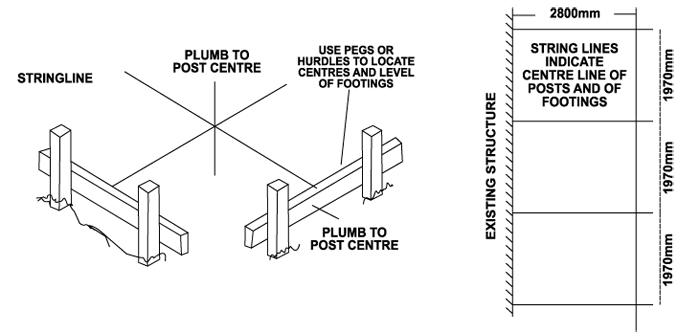


The site on which the carport is to be located is assumed to be level. Fix the cent repoint of the posts as a first step to putting down foundation blocks of 300 x 300mm (or larger) concrete blocks onto which the post stirrups or anchor bases are fixed. Using a string line, line level, etc, and the necessary pegs or hurdles, lay out the carport as below, clearly establishing where and at what height the post footings can be poured to give uniform levels for fixing post supports.
Formwork
Dig 300 x 300mm holes, fit formwork if needed, then pour concrete for post footings with the post anchor bases exactly in place on the proposed centerline. Allow one week for concrete to harden before proceeding with next step.
Cut posts
Cut four posts each at least 2.4m long, from the IBS timber pieces ordered 100 x 100mm x 2.4m DAR, Plane or sand off sharp edges.
Erect & mark posts
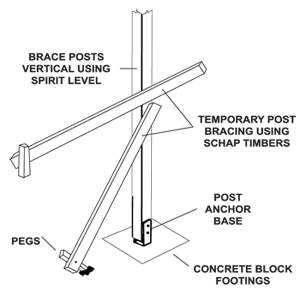
Along the outer side of the carport erect on each post anchor or stirrup, the posts cut in Step 3. Temporarily fix posts but use braces to erect the posts vertically (but temporarily). Fix all bracing no higher than 1500mm above post bases.
Starting with the front post, mark 2.4m above final ground line and using string line and line level mark similar horizontal height on the other four posts. (Note that in this carport design both beam and ledger are installed horizontally.)
Cut housing for beam
Demount posts and cut full housing for 150 x 50mm x 6.0m beam in each post. Cut off excess post length at the 2.4m line described in Step 5.
Re-erect posts
Erect posts on bases, firmly fixing posts on bases and to temporary braces.
Cut and fix beam
With posts erected and re- braced, beam can be cut to 6.0m length or to a length to fit flush with outer faces of front and rear posts. Mark out and drill bolt holes in beam on centre line of each post which should be as indicated in diagram below. Locate beam on posts. Temporarily nail fix in position, then drill holes through posts using beam holes as guide. Firmly bolt beam into place using two 9.5mm bolts at each post.


Cut and fix knee braces
(See diagram on the right.) Cut two knee braces from the 100 x 38mm x 2.4m as sketched below. (Fit knee braces to the outside of posts and beam.) Fix knee braces to front and rear posts using nails and reinforce nailing with one coach screw at each fixing point.
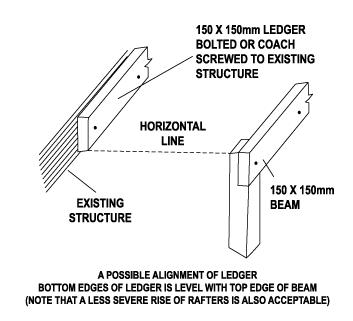
Cut and fix ledger
(See diagram above.) From a remaining timber piece = 150 x 50mm x 6.0m cut a ledger 6.0m long. Using string line or rafter and spirit levels, locate position of upper edge of ledger on existing wall lined up horizontally (and parallel to beam) but at a height at least 50mm above upper edge of fixed beam to allow for roof slope. Mark ledger line and location along existing structure using a string line and level.
Ledger to wall
Locate necessary positions of coach screws or expansion bolts and drill required holes in ledger and existing structure. Fix ledger in place. Note: Where appropriate fix ledger to stud wall at each second stud OR to a brick/masonry wall at up to 1m centres.
Cut rafters and fix
From the timber pieces 150 Ha x 50mm, cut eight rafters 150 x 50mm x 3.0m and commence fixing to beam and ledger, spacing out evenly over the length of beam and ledger. Fix front and rear rafters first and check distance between ledger and beam. Skew nail rafters in place then reinforce nailing using framing anchors. Note that rafters project beyond beam by about 200mm.
Trim rafters
Trim rafters to allow roofing sheets to project 50mm beyond rafter ends (this should mean a wall to rater end distance of 5950 mm). Trim off all rafter ends vertically using string line and plum bob or spirit level to indicate cutting line.
Cut and fix roofing battens
Cut and fix five 5 battens to run along 6.0m length of roof from outer faces of front and rear rafters. Evenly space battens over rafter length but locate battens at ends of rafters.
Cut and fix 200mm fascia boards
Cut two lengths of fascia to fit along front rafter and along rear rafter. (Note: Fascia could be fitted to project beyond end of rafter to conceal guttering if desired.) Fix fascia in position so as to cover exposed long edges of selected roofing.
Cut and fix guttering and downpipe
If required fix guttering brackets, etc to both rafter end and to battens, and install guttering and downpipe.
Fix selected roof
(Note: Before installing roof sheets, a flashing between existing wall and roofing is frequently fitted so as to prevent rain water running down existing wall). Use maximum fastenings as recommended by the manufacturer to fix roofing sheets.
Fix barge mould
Fix barge mould to front and rear fascia.
Remove temporary bracing
The bracing is no longer required. It can be removed.
Finishing
Finish all exposed timber with protective and decorative finishes as recommended by the coating manufacturers. Paint barge mould and guttering as desired.
Author and copyright
This brochure was prepared with the assistance and co-operation of the Timber Development Association NSW Ltd. For further information seewww.timber.net.au.
Copyright Owner: Timber and Building Materials Association (NSW) Limited
Disclaimer
This article was originally written by the Timber and Building Materials Association (AUST) Limited (TABMA). It has since been edited by Home Design Directory (HDD) staff. TABMA and its members (and the HDD) believe this publication is an invaluable guide to those interested in building a an attached carport on their own, but the Association & HDD cannot guarantee that every statement is without flaw. Therefore, the Association and its members hereby disclaim all liability for errors or omissions of any kind, whether they be negligent or otherwise, or for any loss, damage or other consequence which may arise from any person relying on information stated in this publication.
Other DIY articles
Build your own deck in 6 easy steps (DIY deck)