The restoration of timber flooring can range from the removal and replacement of a portion of a single board to replacing the entire floor. In the latter case, it is a relatively simple matter to remove the old flooring and re-lay completely new flooring using conventional methods.
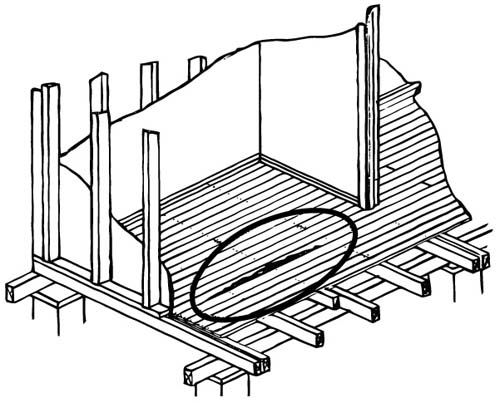
Most floor boards are linked by a tongue which fits into a groove (see steps 3 and 6). This type of flooring poses problems when removal of a single board, or just a few boards, is required. The floor boards are usually nailed to timber floor joists by two nails at each joist, as shown in the sketch. Concealed nailing is sometimes used.
Where floor boards show signs of rot attention must be given to eliminating the conditions which led to the rot. This includes repairing leaking or damaged plumbing, down-pipes, etc. Ensure that the under floor area is kept dry. This can be achieved by improving the ventilation (see 'Special Note 1').
Tools required
|
|
Materials required
Timber
- Tongue & grove flooring board of size, quality to match the existing flooring (if desired and if available). Note: New timber flooring should be ordered after confirming with your supplier that standard size boards will be satisfactory. (See Special Note 2.) However it is good practice to obtain new materials well ahead of use so that they can be loose stacked within the work area for two weeks to allow for “conditioning” to the same moisture content as the existing flooring.
- 50 x 25mm sawn hardwood or softwood, for cleats (as in Method B)
Hardware
- Nails: 50 x 2.5mm bright steel, bullet head, number as required.
- Drills: 2mm diam., for pre-drilling nail holes.
Step-by-step timber floor repair
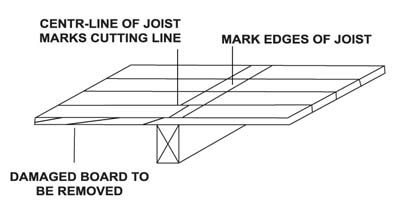
Step 1. Locate floor joists
Joins in flooring boards should be made on joists, so on each side of the damaged area locate the nearest floor joist. This can usually be done by reference to existing nailing pattern, by tapping the floor with a hammer and detecting the change in sound above a joist, or by measurement from wall or known joists. Mark the width of the joists where the boards are to be removed or locate and mark the centre line of joists on the floorboards.
Method A
Step 2. Cross-cut on joists
To separate damaged boards use one of the following two methods:
Method A: If possible, remove nails located on centre lines or if necessary punch the heads right through the floorboard into the joists. Then, using a chisel and hammer or mallet or a tenon or a power saw, cut through the selected boards on this centre line, ensuring that the cut edge is kept straight in the remaining board.
Method B: Using a power jig or sabre saw, or a keyhole saw, and pre-drilled entry holes, cut the board away on the edge of the joist, on one of the pencil lines.
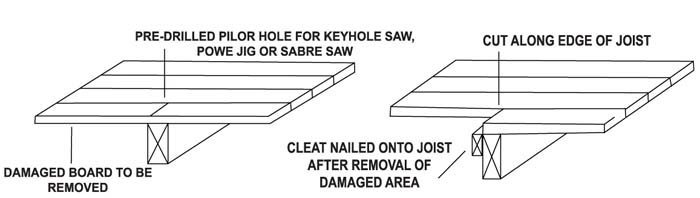
Method B
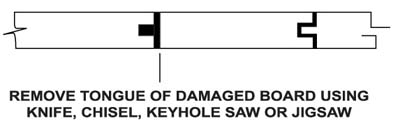
Step 3. Remove board tongue
Using a knife, keyhole saw, jig saw or other suitable cutting tools, cut through the tongue(s) of the board to be removed.
Step 4. Remove damaged board
Lever out the damaged boards using a chisel or similar. If difficulty occurs with removal or lifting of nails on some joists, then drive problem nails right through the floor board using a nail punch. Avoid breaking tongues (or grooves) in remaining boards.
Step 5. Replacing damaged board
Measure the length of new boards required and cut length from the pre-conditioned replacement boards. Slightly angle the cut at each end.
Step 6. Trim off the lower section of the groove
Trim off the lower section of the groove using saw, knife or plane. (See also 'Special Note 2'.)
Step 7.
For Method B of step 2 nail a cleat to the exposed side of the joist, onto which the new boards will be fixed.
Step 8.
Fit prepared board into gap in floor, pre-drill nail holes in ends of new boards and nail in place, either onto the normal joist or onto the cleat fitted in Method B. (See step 6.)
Step 9.
Punch the heads of new nails below surface of board and fill hole with appropriately colored filler.
Step 10.
Sand back the replacement board(s) as required and finish to standard of the original floor.
Special note 1
Rot in floorboards is frequently caused by excessive moisture in the under floor area. This is particularly so in many heritage and older houses where under floor ventilation has never been adequate and cannot dry out the damp or wet soil under the floor. Before rotted floorboards are replaced, this underfloor source of excessive moisture must be removed. Here are several suggestions.
(i) Improve flow-through ventilation under the floor by clearing or replacing existing ventilators, by fitting additional ventilators in perimeter foundation walls and by providing ventilators in under-floor dwarf walls to eliminate dead air spots.
(ii) Cover the under-floor ground surface with sheets of heavy duty building- grade polythene sheeting.
(iii) Check all drain pipes, rain water down pipes and plumbing for leaks, and repair or re-locate as necessary.
(iv) Evaluate the location of all garden beds near the house. Excessive watering of a garden frequently directs water under the house into this underfloor area. Insect attack may damage floorboards but the cure is usually obvious. If termites are suspected then a reputable pest exterminator should be consulted. Lyctus borers do attack sapwood of some timbers but could be controlled by appropriate treatment using insecticides. Again, consult an expert in this field, although it is likely that in dry flooring which is several years old, no further borer activity would be anticipated.
Special note 2
Steps 1-10 describe procedure for removing and replacing a single board with tongue & groove board of equal thickness and dimension. With changes in supply of timber in recent years it may be difficult if not impossible to exactly match the existing flooring. Several suggestions to overcome the problem are:
- Where the damaged board is in a conspicuous place and it is therefore very desirable to replace it with the same material, then you could remove another board from a less conspicuous place - for example, from a less used area or another room or from alongside a wall. If this method is used then you would need to replace the second board(s) with new floorboards which differ from the original, but are still acceptable in the less obvious location.
- Thickness variation problems are overcome by either packing pieces on the joists under the boards when too thin or, by shaving, chiselling or sanding off the area over the joists when boards are too thick. Some additional difficulty will be in sanding off the surface of new board(s) back to the same level as the original board. In many cases this is better done before the single board is fitted using a power sander or planer. Where several boards are replaced, resanding or relevelling the whole floor may be desirable.
- Width variation from original flooring is very likely when older floors are being repaired. If current merchant stock does not match and replacement boards cannot be obtained as in (i) above then compromise solutions must be found. Minor variations may be overcome by using plastic wood or similar as filler material. Otherwise new boards may need ripsawing along the length to fit, or even additional old boards removed to enable better fitting of the new boards. For example, you may find it easier to refit, say, three new boards in the space of two old damaged boards. In some areas, specialist moulding/milling workshops may be known who could custom mill/mould new boards to fit exact dimensions needed (at a cost).
Author and copyright
This brochure was prepared with the assistance and co-operation of the Timber Development Association NSW Ltd. For further information seewww.timber.net.au.
Copyright Owner: Timber and Building Materials Association (NSW) Limited
Disclaimer
This article was originally written by the Timber and Building Materials Association (AUST) Limited (TABMA). It has since been edited by Home Design Directory (HDD) staff. TABMA and its members (and the HDD) believe this publication is an invaluable guide to those interested in repairing timber floors on their own, but the Association & HDD cannot guarantee that every statement is without flaw. Therefore, the Association and its members hereby disclaim all liability for errors or omissions of any kind, whether they be negligent or otherwise, or for any loss, damage or other consequence which may arise from any person relying on information stated in this publication.
Related articles
Build your own deck in 6 easy steps (DIY deck)